Friday, December 18, 2020

Growing In Unity: Day 5

 Day 5: No Line Holiday Card and Coffee Notecard


I can't believe how quickly this week of sharing my art with you all has gone. Thank you so much for all your kind words and likes here and over on the facebook groups. For my final day as a Growing in Unity gal, I created two cards using my Copics. The two sets featured today are "Warmth of Christmas" and "Love to Go" as well as the Coffee Lovers paper pack. 


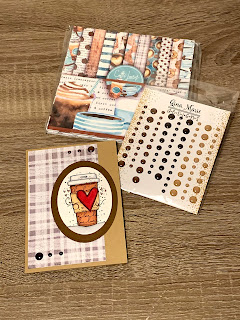
Here are the supplies I used for these two cards. For the wreath card, I opted for a no line coloring of the image. Have you tried using no line coloring before? Did you find it intimidating? I stamped the image in Memento London Fog on Sweet Sentiment coloring paper. I fussy cut the image by hand with my trusty cutter bee scissors. The papers were from a scrap pile I've been trying to use up. Paper tape adhered the layers with foam dimensional adhesive popping up the wreath. 

For the coffee notecard, I stamped the image in Memento Tuxedo Black on Sweet Sentiment coloring paper. I diecut the image using oval dies from Spellbinders. All layers were adhered with paper tape. I absolutely love my unity paper packs, so naturally I had to use one for this card I made for my favorite Starbucks barista. I forgot to set aside the markers for the coffee note card (soo sorry). I decided to embellish with a few Gina Marie dots in coffee colors. 

Don't forget to leave a comment to be entered to win one of two Unity prizes! Thanks once again for joining me over the course of the week. 

Wishing you all a very Happy Holidays,

Holly

Thursday, December 17, 2020

Growing In Unity: Day 4


Day 4: Watercolor Holiday Card


I can't believe how quickly this week of projects is flying by. Today, I have a watercolored panel holiday card featuring the "Deck The Halls" from Unity Stamp Company. I used the Holiday Intrigue paper pack as well. This card was inspired by a sweet couple we know. 


I absolutely love the details of this stamp. I chose to color it in watercolor with the Arteza Real Brush markers. The panel was cut from a sheet of Strathmore Cold Press Watercolor paper. The fine brush tip of these allows me to get super fine lines like those of the pine needles. 


These are the different colors I used and I changed shades by blending with the water brush. For the background washes, I colored a circle on my silicone mat and picked up color with the water brush to avoid harsh lines. 


Above are all the supplies I used to create this card with the exception of paper tape to affix the panels and foam dimensionals for the sentiment. I did use some sizzix rectangle dies to cut the panels. There are so many amazing images at Unity, so make sure to snag some that speak to your style. I hope something about my card inspires you to go and experiment in your own craft room today. 

Crafty Wishes,
Holly


Wednesday, December 16, 2020

Growing In Unity: Day 3

Day 3: Bookmark Slimline Card

    For today, I created a simple card that can keep on giving even after the holidays. I decided to take a bookmark and make it the main focal point of the slimline card for a friend. The slimline card makes it perfect for a money card if you have a need for those.


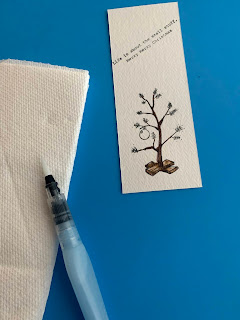
    After cutting a piece of Strathmore Cold Press Watercolor paper to 2" x 5.5" or your preferred length for a bookmark, I stamped the "Small Stuff Christmas" image and sentiment with Gina K amalgam ink. This itty bitty set is one of my favorites to use for the holidays. I watercolored the image using Arteza real brush markers. The colors can be seen in the above image. Once dry, I punched the hole for the eyelash string. I used some from the Noel blend from Busy Blends by Pammy J. 

    I pulled some green card stock from Recollections to create the card base for the slimline card. I cut down the paper to 7" x 8.5." Then I scored it at 3.5" for the fold. I had a square of red glitter stock from Brutus Monroe sitting around that I thought would make the bookmark POP. I trimmed it to fit the slimline card. I used an exact knife to cut the slits for the bookmark to slide into. I adhered each layer using some paper tape making sure to avoid the areas around the slits. While you can't see it pictured above, I added an inner layer of lightweight light green paper for me to write on. The dimensions I used were 3" x 8."

    I hope this idea inspired you to play around with the idea. I always feel guilty that people don't want to keep their holiday cards, so I tried to find a creative solution. This idea can easily translate for thinking of you cards, birthdays, etc. If you make one, please tag me in your projects so I can see them. Don't forget to comment for a chance two win one of two Unity prizes.

Stay crafty friends,
Holly


Tuesday, December 15, 2020

Growing In Unity: Day 2


Day 2: Manila Tag Gift Card Holder & Highland Cow Christmas Card


    Today, I created two projects for you all. I took a large manila tag and created a gift card or money holder tag. My oldest child is getting to that age where he has begun asking for gift cards for music, books, and gaming, so I figured that I would make a fun holder using all my Unity Stamp Company goodies. 


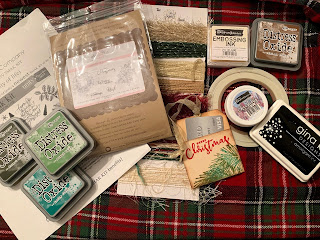
    I took a 3 1/8' x 6 1/4" manilla tag from Unity and scored it to fit a gift card. I stamped sheet music stamp from the Nov 2019 SMAK kit 'Beauty of Life" in Gina K obsidian amalgam ink. Then I added layers of the pine branches in three shades of distress oxide ink. I selectively inked the stamps while they were on my platform for variety. Then I stamped the Merry Christmas sentiment from "Warmth of Christmas" stamp set in Brutus Monroe embossing ink and embossed it in BM Christmas Eve embossing powder. Afterwards, I dabbed the edges with vintage photo distress oxide to give it an antique feel.


    Afterward, I used sookwang/scoretape to help affix it to create a pocket. Add your favorite string or ribbon and you're good to go! I used ribbon from Busy Box Blends by Pammy J for this tag.  


My second project was a Christmas card for a friend who LOVES highland cows. (Hopefully she isn't reading the blog...) I stamped the "Take No Bull" stamp in Gina K Obsidian Amalgam Ink on Strathmore Cold Press Watercolor Paper. The image was colored using Arteza real brush markers in shades of red, brown and orange. (Sorry my 4 year old spilled the bucket of markers so that I don't have the exact shades.) I blended out using a water filled brush to the desired look. I chose two shades of blue for the sky and blended those out for a layered cloud effect. I went back and dulled the black outline on the cloud using a White Gelly Roll pen. 

    Once dry, I affixed the watercolor panel to a background piece of paper from Unity's Krafty Season paper pack with paper tape. These layers were added to a kraft paper card base from Darice. I stamped the Season's Greetings sentiment from the "Warmth of Christmas" stamp set in embossing ink from Brutus Monroe and used their Alabaster embossing powder to make it pop on the tag. I affixed the tag to the card using Sheer White 3/4" organza ribbon that I also got from Unity. I attached the lights embellishment that I found in the sticker aisle at Hobby Lobby using micro glue dots.

I hope these projects inspired you to pull out your favorite Unity stamps and get inky. Both projects can be adapted easily for other holidays as well. Remember that you are only limited by your imagination! What's currently on your craft desk?

Crafty hugs to you all,
Holly


Monday, December 14, 2020

Growing In Unity: Day 1


                                                                    Ornament Gift Tags

Hi, everyone! I can't wait to show you my ideas over the next week for Growing In Unity. I'm very excited to be a part of this. Today's idea came to mind when I started wrapping gifts this past weekend to ship to family who is out of state. I didn't have any sticky labels left, so why not create something special?


I used Northwoods Peace, Joy and Things, Warrior Cancer Ribbon, and Christmas Bough from Unity Stamps to create the ornament gift tags. I wanted to include the cancer ribbon one for my grandmother who is in remission for breast cancer. You can make wood slice tags/ornaments for all kinds of occasions or memories. Your only limit is your imagination!


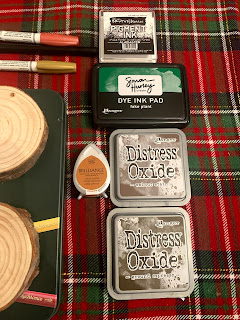
I used my magnets to create a jig for the ornaments to sit in as I stamped in layers. I like having the ability to reink and stamp a layer if it didn't fully imprint. The inks used can be seen in the supplies photos above. I did 2-3 layers of each ink. You can go in with a detail brush and fix any areas or use your favorite colored pencil to add or adjust any details. 


So, I am human and make errors, but I simply look at them as opportunities to embellish.


Gesso to the rescue when my Sharpie pen didn't look quite right!


I didn't use any sealant or fixative on these ones, but have used micro distress glaze in the past. Remember to comment below and make sure I have your email address so I can contact you if your name is drawn to win one of two Unity prizes at the end of the week. I hope you're inspired to try a simple stamped design as a gift for friends and loved ones this week.

Crafty Hugs,
Holly R. 


Monday, December 7, 2020

Mother/Daughter Crafting


One thing I loved while growing up was crafting occasionally with my own Mom. I wanted to share that experience with my own daughter. Madisyn recently turned 9yrs old and wanted to "color like Mom." So, I brought out my old random assortment of alcohol markers from before I had to get ALL the Copic markers. 


I broke out the October class "Halloween Critters" from Sweet Sentiment. Jammie makes the classes so easy to follow along for all ages. I made sure to swatch Madisyn's hand-me-down markers to follow along as closely as possible. Since the videos are on YouTube, we could pause as often as needed. 


Madi's work on the left. Mom's on the right. 


Doing classes with me has brought a new level of knowledge and confidence to her art. I love seeing her talent grow as she continues to practice. She thinks the pencil classes were much easier to do, but can't wait to "get more markers."

I encourage you all to share your knowledge and passion for all things crafty with younger generations. This artistic outlet has let her express all her feelings and emotions better during this pandemic. 

What should we tackle next? Let us know what you want to see more of!

Crafty Hugs,
Holly Reifke ( & Madisyn )


Welcome To My Craft Space

Hi! I'm Holly, the face of Mama Bird Crafts. I have been married to my wonderful husband for 11 years. We added 3 kids and 1 dog to our little home. It keeps me very busy, but my craft desk keeps me calm. Having a creative outlet amongst the mass chaos is key for me.

(Photo credit: Krista Cox Photography)


I've been crafting since I was in high school. I had some basic scrapbooking and stamping skills back then. I have grown so much since then thanks to all the new techniques and products available. I can be found making scrapbooks, cards, gift bags, tags, sewing simple things, cross stitch or crocheting. I love to dabble in all kinds of "crafty goodness."

Hope you all will enjoy seeing the different projects that I share and how I made them!

~Holly~

Growing In Unity Blog Hop

Welcome to the Growing In Unity Blog Hop, everyone! If you've already been hopping along, thank you for continuing along our little hop....